Taurus HY Auto Catch Crush Manual
Health & Safety
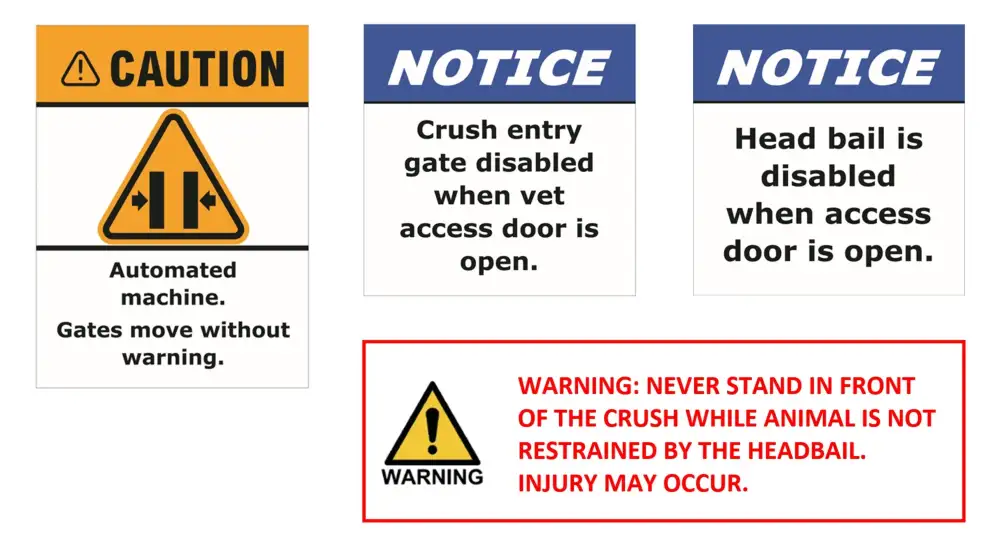
Pay attention to all warning signs when the Crush is in use.
The Taurus HD3 & HD5 Auto Catch Cattle Crush has moving gates positioned in multiple locations as shown below. Do not enter the squeeze or head bail area at any time as this may result in serious injury or death. Ensure the crush operation area is for trained operators only, no children are permitted.
Entry is only permitted through the gates indicated below when in operation.
Safety Features
Door Sensors
Sensors and safety switches are positioned on the Vet and Head bail entry gates for operators’ safety. This prevents crush entry gate and Head bail activation. It also deactivates the release button preventing an animal from being released from the crush while the entry gates are open.
Emergency Stop
Isolates all power and discharges all hydraulic pressure.
E Stop is located on the control panel at the rear of the crush.
Installations Instructions
- Level concrete surface approx 2.5-3.5m wide
- 240V power supply or generator
- EID can run off a power supply or separate battery.
- Please read and understand the instructions before operating your Taurus HD3 or HD5 Auto Catch Cattle Crush.
Scales & EID Compatibility
- Compatible with Te Pari T20, and T30 Scales, Gallagher 610/810/TSI Scales & Tru-test XR/ID Series Scale
- ERail controller (ASR566) needed if connected to Tru-test or Gallagher Scale systems
Dimensions
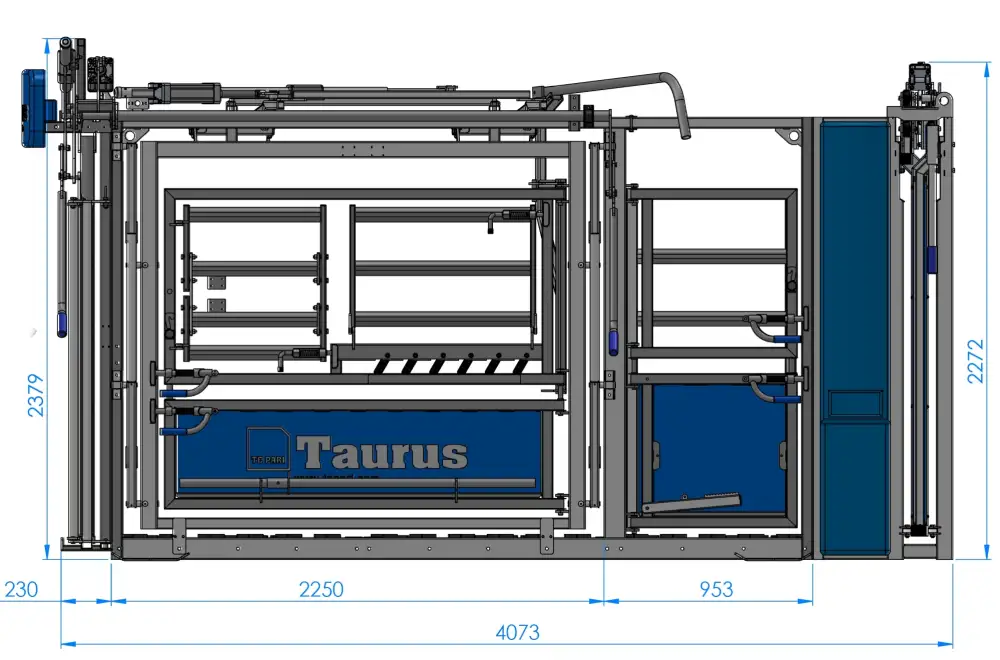
| Dimensions | Taurus Vet Crush | Taurus Vet Crush with Injection Gates |
|---|---|---|
| Full Length | 4100mm | 4400mm |
| Animal Compartment | 2250mm | 2450mm |
| Vet Section | 950mm | 950mm |
| Exterior Width | 1500mm | 1500mm |
| Interior Squeeze Width | 340-750mm | 340-750mm |
| Height | 2380mm | 2380mm |
| Weight | 1160kg | 1250kg |
Drafting Directions
Below are diagrams showing the drafting directions and gate numbers for the Taurus 3-Way Draft and 5-Way Draft options.
Control Dashboard
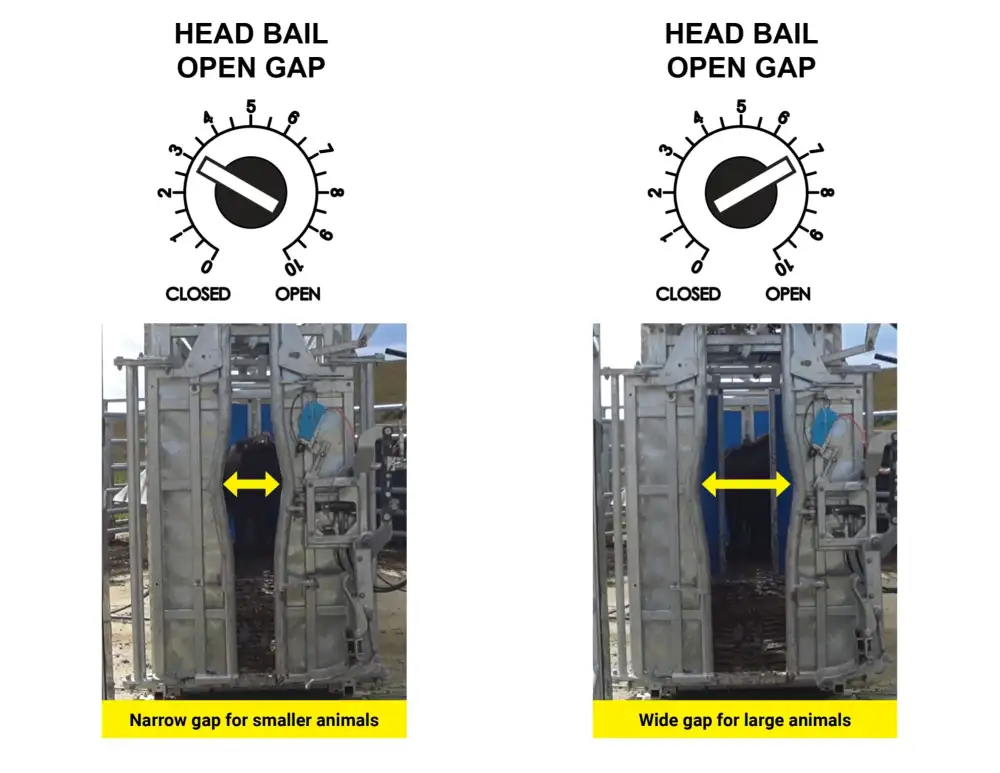
- Head bail opening gap: Used to control the preset auto-catch gap distance of the head bail. The higher the number the larger the opening gap.
- Draft gate reset time: Used to control the closing time of the drafting gates.
- Emergency stop: This isolates all power and discharges all hydraulic pressure.
- Power on/off: When illuminated, the button turns electrical and hydraulic power onto the machine.
- Auto draft on/off: When illuminated, the button allows the machine to enter the Auto Draft mode. See an explanation of this function below.
- Auto catch on/off: When illuminated the button allows the machine to enter the Auto Catch mode. See an explanation of this function below.
Switch Dashboard
- Race gate: Push button. Used to manually control the opening and closing of the race gate.
- Entry gate: Used to manually control the opening and closing of the Entry gate.
- Vet gate: Used to manually open or close the vet gate for operator access.
- Draft direction: Used to manually control the direction of the drafting.
- Squeeze: Used to manually apply side squeeze to the animal.
- Head bail: Used to manually control the opening and closing of the head bail.
- Chin lift: Used to manually raise or lower the chin lift.
- Release: This button is used to return the chin lift, head bail and squeeze to the rest position in preparation for the release of the animal.
Setting the Head Bail for Auto Catch
Setting the head bail gap is critical to efficient auto-catching. If the gap is set too small the animal will hesitate and not advance through the head bail. Setting it too wide could allow the animal to get too far through causing a miss catch.
Adjust the head bail opening gap knob to achieve the desired gap. Once set, press the auto catch button.
The larger the number, the wider the opening.
The smaller the number, the narrower the opening.
NOTE: See Mode 1 and Mode 2 for Auto Catch Sequence.
Operating Modes
The Taurus Auto catch crush has four modes of operation to give total flexibility.
Mode 1
Auto draft button on - Auto catch button on.
When switched to Auto mode the crush will adjust ready for auto drafting/ auto catching. Use this mode to auto-catch and auto-draft as to weights selected on the scales panel.
- Set the Draft Gate switch to Straight before operation. NOTE - Auto drafting commands will be overridden if the gate switch is not set to straight.
- Press the Power Button. The button will light up, the entry gate will automatically open and the head bail will automatically close.
- Set the Head Bail Open Gap. The head bail will close to the preset distance selected on the control dashboard once the operation has started.
- Press the Auto Catch button. Note, the button will light up.
- Press the Auto Draft button. Note, the button will light up.
- When an animal enters it will be detected by a sensor mounted in the top of the crush. This will start the process of closing the Crush entry gate automatically.
- Once the animal places its head through the yoke in the head bail it will automatically close.
- Use the Chin Lift Up switch to raise the chin lift, thereby immobilising the head. 2 3 4 1 6
- Once the animals’ weight has been recorded 5 the drafting gates will move automatically as per the selected weight setting in the scales.
- Push the Release Button. This automatically returns all functions to the start positions and releases the animal.
- Once the animal has cleared the draft gate sensor the process will begin again.
Note: to have good cattle flow it is important to set the head bail opening gap correctly. See the troubleshooting section.
Mode 2
Auto draft button off - Auto catch button on.
This mode allows for catching the animal at the head bail with the option of manual drafting.
- Set the Draft Gate switch to Straight before operation.
- Press the Power button.
- Set the Head Bail Open Gap. The head bail will close to the preset distance selected on the control dashboard once the operation has started.
- Press the Auto Catch button. Note, the button will light up.
- Use the Entry Gate Open switch to let the animal into the crush.
- Use the Entry Gate Close switch to close the gate behind the animal.
- Once the animal places its head through the yoke in the head bail it will automatically close.
- Use the Squeeze Close switch to side-squeeze the animal (if desired).
- Use the Chin Lift Up switch to raise the chin lift, (if desired).
- Use the Draft Direction switch to select to divert the animal to the desired direction.
- Once all operator gates are closed. Push the Release button. This automatically returns all functions to the start positions and releases the animal. 2 3 1 8
- The Entry Gate Open will automatically open to let the next animal into the crush. 4 5/6
Note: To have good cattle flow it is important to set the head bail opening gap correctly. See the troubleshooting section.
Mode 3
Auto draft button on - Auto catch button off.
When switched to Auto mode the crush will adjust ready for auto drafting. Use this mode to auto weigh and auto draft to weights selected on the scales panel.
- Set the Draft Gate switch to Straight before operation. NOTE - Auto drafting commands will be overridden if the gate switch is not set to straight.
- Press the Power button. The entry gate will automatically open, and the crush gate and head bail will automatically close.
- Press the Auto Draft button. Note, the button will light up.
- When an animal enters it will be detected by a sensor mounted in the top of the crush. This will start the process of closing the Crush entry gate automatically.
- Once the animals’ weight has been recorded the drafting gates will move automatically as per the selected weight setting in the scales once all operator gates are closed.
- Once the animal has cleared the draft gate sensor the process will begin again.
Mode 4
Auto draft button off - Auto catch button off. (Manual mode) This disables all auto-catching and drafting features and relies on the operator to use the control switches or remotes.
- Set the Draft Gate switch to Straight before operation.
- Press the Power button.
- All other functions are manually controlled by the switches (circled).
- Use the Head Bail Close switch to close the head bail to the desired distance.
- Once all operator gates are closed. Push the Release button. This automatically returns all functions to the start positions and releases the animal.
- Use the Entry Gate Open switch to let the next animal into the crush.
Remote Control Button Mapping
Taurus HD3 Model
You can only pair a remote inside the first 10 seconds of “Power On”.
Pairing the remote:
Simply press the Entry and Race buttons together inside the first 10 seconds of power on.

Power Pack & Pressure Settings
Powerpack Operation
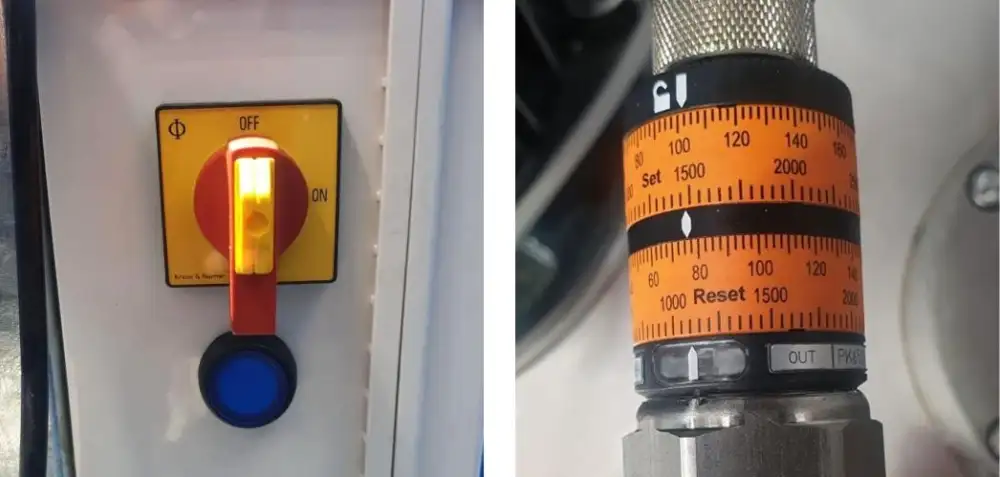
To turn the power pack on, rotate the red switch to the ‘ON’ position and press the blue button which powers the 24v circuit.
Powerpack Pressure Regulator
Pictured to the right below is the main pressure switch on the hydraulic power pack. The ‘Set’ collar should be rotated to read 2250 psi and the ‘Reset’ collar should read 1800 psi. This regulates what pressure the power pack operates within.
The oil used in the hydraulic system is Morris Liquimatic HV22 Hydraulic Oil.
Ram Pressure Regulators
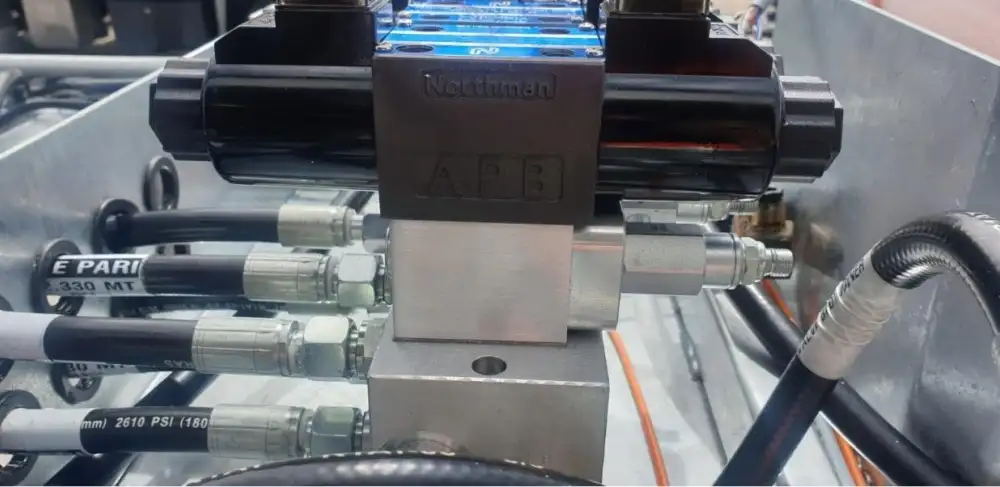
Below is the valve bank which controls the pressure to the head bail, squeeze, entry gate and draft gates. To increase pressure, loosen the lock nut and thread clockwise using an allen key in the head of the screw.
Hydraulic Ram Pressure Settings:
- Head bail: 1000 – 1100psi
- Squeeze: 800psi
- Sliding Gate: 700psi
- Draft Gates: 500psi
Maintenance
Cleaning
Simply cleaning down your head bail after use will increase its working life. Cattle urine and/or faeces can have a corrosive effect on your equipment. Regularly scrape out underneath your crush to ensure weighing accuracy. We recommend cleaning the crush without the use of water blasters as water can often lead to damaging the load cell(s), which will cause weighing inaccuracies and may require replacement over time.
Lubrication
Lubricate all grease nipples, pivots and tracks on your head bail at least every 4 weeks, or for every 1,000 cattle processed. The nylon wheels on the top of the head bail require lubrication also. We recommend using a silicon spray, or CRC to perform this task. Slam latches also require regular lubrication to ensure they remain easy to operate and do not start to stiffen.
Check and replace any worn components.
Annually check pivots and bolts for wear and replace as required. Bolts need to be kept tight on the head bail, as they can become loose over time causing the head bail to become sloppy, this will also cause additional wear on the unit.
Contact Te Pari Products, or your local dealer for assistance with product part replacement.
Trouble Shooting
| Symptom | Cause | Solution |
|---|---|---|
| Function switches won’t work. | No power | Press “power on” button on Control dashboard. |
| Check all power is supplied to the machine. | ||
| Ensure E stop is not pushed in. | ||
| Entry Doors not closed | Check draft gate doors are closed. | |
| Check vet gate doors are closed. | ||
| Opening and closing of gates and doors slow | Hydraulic oil level low | Check and top up if necessary. |
Drafting Issues
| Symptom | Cause | Solution |
|---|---|---|
| Drafting gates not functioning in mode 1 & 3 | Auto Draft not on. | Press Auto draft button. |
| Draft switch not set to straight. | Change switch to straight. | |
| Incorrect draft weights set up in scales system | Review draft settings. |
Auto Catch Issues
Note: Boxes in yellow are processes that can be changed while in automatic mode.
| Symptom | Cause | Solution |
|---|---|---|
| Head bail will not auto close. | Auto Catch not on. | Press Auto Catch button. |
| Head bail catch distance inconsistent. | Hydraulic pressure too low. | Check fluid level. |
| Check pressure setting. | ||
| Cattle hesitant at the head bail. | Gap not big enough. | Use “open” head bail switch to increase the gap. |
| Use larger value on head bail gap timer. | ||
| Distractions | Remove noise, shadows, and movement. | |
| Keep operators out of the flight zone. | ||
| Animal getting caught around the head and not the neck. | Front sensor to close to the head bail. | Move sensor forward to accurately catch the animal around the neck. |
| Cattle pushing through the head bail. | Gap set too wide. | Select smaller setting on the head bail gap timer. |
Thank you for your purchase.
Our promise is simple...
It works for you (or we will take it back).
For peace of mind, we offer a manufacturer's warranty on all our products. See our website for more information.


